Showing posts with label charm pack. Show all posts

Monday, June 5, 2017

Nesting - What's Old is New Again

Wow, I'm not sure I ever thought I'd finish this quilt. I made the top what seems like ages ago, but was really about 5-6 years ago. I used some very precious Tula Pink Nest fabric (3 charm squares) to make the top, which is a modified version of a Weeks Ringle/Bill Kerr pattern that I thought would be good to showcase the charm packs and the fabric without having to cut into them. 

I ended up just quilting straight lines across the quilt about 1/2" to 3/4" apart. I didn't measure how far apart the lines were; I just went for it. I think the reason it took me so long to quilt and finish this quilt is that I had intentions of custom machine quilting it, but I could never get inspired by a particular design(s) to dive in. So it sat unfinished. Until I decided to just put the quilt on my longarm and go for it. 

My plan is to use this quilt as a beach blanket. Some of you might be gasping right now at the fact that I'm planning on using such rare, precious Tula Pink fabric on the beach, but I decided I'm going to use and love this quilt. I put a dark print from the collection on the back that I got on clearance for about $3 a yard when the line was out at the time. 

The quilt is slightly smaller than a twin size, but it's perfect for lying out at the beach and reading a good book. I bound the quilt in the same Nest fabric as the back since I had so much yardage of it. One of the reasons I'm excited to use this quilt is that it really shows how my style has changed through the years. I love that about myself. If I was still making the same type of quilts as I was five years ago, I'm not sure I'd be quilting. I love evolving my style and trying new things. That's the joy of quilting to me. 

Wednesday, May 14, 2014

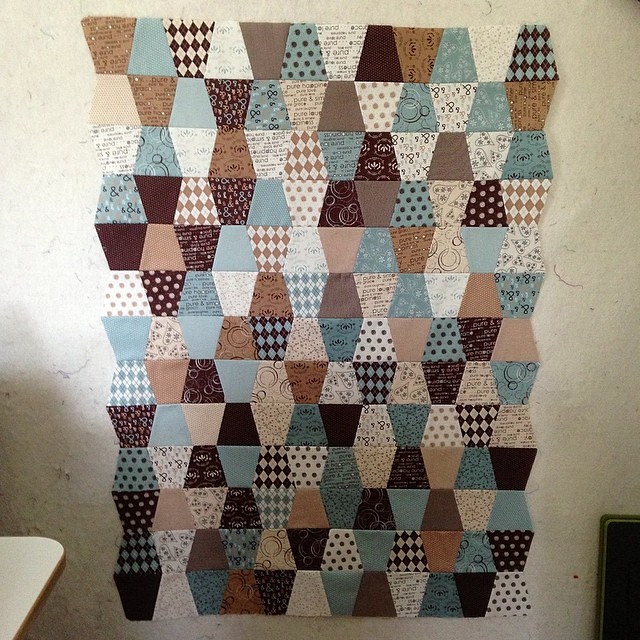
WIP: A Baby Quilt

Wow, it's been a long time since I've sewing. This has been our busy season with work. Throw on a couple of grad school finals and sewing has been practically non-existant. Fortunately, I managed to squeeze in a little sewing time here and there over the past month to throw together this simple baby quilt for my cousin who's expecting her first baby late this summer.
Finished tumble baby quilt top. Now back to finals.

This was the second tumbler quilt that I made. Both went together very easy. I used my Accuquilt Go! to cut the fabric. I used four charm packs for this quilt that I had lying around for a while now. I'm determined to use some of the fabric I have in my stash, so I'm hoping to use fabric I have on hand for the backing and the binding.

My goal is to have this quilted and bound within the next month. I think it's do-able, but you never know. 

Thursday, October 31, 2013

Blogger Quilt Festival - Baby Quilt


While at SewDown Philadelphia, a bunch of us were looking for something to do during the free sew time. I had come directly from a work trip in Milan, Italy, so I didn't have much room to pack extra fabric/projects. Fortunately, we all received charm packs of Michael Miller Cotton Couture solids in our swag bags. A bunch of people decided to do a challenge to make a quilt using the charm pack - and thus the SewDown ThrowDown was born.
While I think everyone else added additional fabric, I set out to just use the fabrics provided in the charm pack - my own personal challenge within the challenge. I knew my suitcase was nearing the max weight, so adding more fabric might have put me over the limit (I ended up three pounds over and had to do some serious moving of stuff anyway).

I decided to make half square triangles, separating the colors by warm and cool colors. Overall, I think trying to separate the colors that way was okay, but because the charm pack was full of colors that could have gone one way or another - yellow or green, or purple or pink - that the separation of colors wasn't quite what I was hoping for.  That being said, I'm still really pleased with how this quilt turned out.

I backed it using an Art Gallery print that I've had in my stash for a couple of years now. As you can see above, I quilted this quilt, echoing either side of the diagonal lines of the HSTs.

I bound the quilt using Kona Iron.


Quilt Stats:
32" x 28"
Fabric: Michael Miller Cotton Couture Solids, Kona Iron, Art Gallery (I forget the line)
Batting: Warm and Natural
Thread: Aurifil #50 2600


AmysCreativeSide

Tuesday, September 17, 2013

SewDown ThrowDown

While at SewDown, a bunch of us were looking for something to do during the free sew time. I had come directly from a work trip in Milan, Italy, so I didn't have much room to pack extra fabric/projects. Fortunately, we all received charm packs of Michael Miller Cotton Couture solids in our swag bags. A bunch of people decided to do a challenge to make a quilt using the charm pack - and thus the SewDown ThrowDown was born.
While I think everyone else added additional fabric, I set out to just use the fabrics provided in the charm pack - my own personal challenge within the challenge. I knew my suitcase was nearing the max weight, so adding more fabric might have put me over the limit (I ended up three pounds over and had to do some serious moving of stuff anyway).

I decided to make half square triangles, separating the colors by warm and cool colors. Overall, I think trying to separate the colors that way was okay, but because the charm pack was full of colors that could have gone one way or another - yellow or green, or purple or pink - that the separation of colors wasn't quite what I was hoping for.  That being said, I'm still really pleased with how this quilt turned out.

I backed it using an Art Gallery print that I've had in my stash for a couple of years now. As you can see above, I quilted this quilt, echoing either side of the diagonal lines of the HSTs.

I bound the quilt using Kona Iron.


Quilt Stats:
32" x 28"
Fabric: Michael Miller Cotton Couture Solids, Kona Iron, Art Gallery (I forget the line)
Batting: Warm and Natural
Thread: Aurifil #50 2600

Fresh Poppy Design

Tuesday, May 8, 2012

Tutorial - Charmingly Crazy Nine Patch Quilt

Charmingly Crazy Nine Patch

This is a quilt that I designed a while back and I wanted to share a tutorial on how to make it.  I made this quilt using four charm packs and some coordinating yardage.  The whole quilt is made using Basic Grey's Sultry line.

Here you can see what a basic block looks like.  It's a crazy nine patch that is sashed using a very light pink and then all of the blocks are sashed using a medium pink.  I didn't want a lot of contrast in this quilt, so I went for a lot of light and a few medium value fabrics to coordinate with the charm packs.


Materials
This tutorial is for the lap quilt, but I am also providing a materials list for other sizes should you want to make something smaller. 


Table Runner (16” x 44”)
Table Topper (42” x 56”)
Wall Hanging (56” x 56”)
Lap Quilt
(56” x 70”)
Number of Charm Packs (calculated with the average of 40 squares (or charms) per pack)
1
(27 charms total)
2
(54 charms total)
3
(81 charms total)
4
(108 charms total)
Block Sashing (light pink)
1/3 Yard
½ Yard
¾ Yard
1 Yard
Quilt Sashing and Inner Border (medium pink)
¼ Yard
½ Yard
2/3 Yard
¾  Yard
Border
N/A
1 Yard
1 Yard
1 Yard
Backing
¾ Yard
1 ½ Yards
3 Yards
4 Yards
Binding
¼ Yard
½ Yard
½ Yard
½ Yard

Optional: 3 ½” square acrylic ruler, paper plates for organizing groupings

Cutting
For this project, the numbers are for the lap quilt pictured above.
           
Preparation
If using fabric other than charm packs, cut your fabric into the required number of  5” squares.

Block Sashing (light pink) 
1. Cut the sashing fabric into 26 strips that are 1¼” x WOF (Width of Fabric).
2. Cross cut your sashing into 72 strips that measure 3 1/3” x 1¼”.
3. Cut an additional 48 sashing strips that measure 11” x 1¼”.
4. From the final 1 ¼” strips, cut 24 sashing strips that measure 12½” x 1¼”. 
Quilt Sashing (medium pink) 
5. Cut the quilt sashing fabric into 11 strips that measure 2 ¼” x WOF.
6. Cut 5 strips that measure 2¼” x 40”.
7. Cut 8 quilt sashing strips that measure 2¼” x 12½”.
8. Cut 2 strips that measure 2½” x 58”.  *Note that you will need three strips total for this.  Cut one of the strips in half and sew it to each of the other two strips and trim.
Border
9. From the border fabric, cut 6 strips that measure 6” x WOF”.

Directions
Note: All seams are ¼” 
Preparation
1. Make 12 piles of nine 5” charm squares to create your crazy nine patch block.  Make sure you have a good variety of colors in each pile so that one grouping doesn’t stand out more than the others.  
Sewing the Crazy Nine Patch
Repeat these steps for each grouping.


1. CAREFULLY align each pile so that all nine squares lie directly on top of each other.  It’s easiest to do this on your cutting board so that you don’t need to move your perfectly aligned pile and reposition it after you move it.  Aligning the piles is the only area where you’re going to need to be very precise, the rest of this step will require you to let loose.

2. Place your ruler vertically about a third of the way in on the left and at a slight angle.  Cut through all 9 layers of the pile.

3. Take ONE piece of fabric from the TOP of the smaller cut piece on the left and move it to the back of that same pile.  Throughout this entire section, you will always move the smaller piece of fabric.

 
4. Being careful not to change the order of the pile you just cut, sew the cut pieces together.  It is helpful if you chain piece the fabrics and keep them connected until after you’ve ironed all of the pieces to ensure that the order will always stay the same. 

5. Iron the rectangle and stack the pieces one on top of each other in the same order that you sewed your pieces.

6. On the right side of the now rectangle, place your ruler vertically about 1/3 of the way in at a slight angle and cut through all 9 layers.

 
7. Take TWO pieces from the smaller, cut side on the left and move it to the back of the pile. 

 
8. Repeat steps 4 and 5. 

9. Rotate the block 90 degrees to the right and place your ruler vertically on the pile about a third of the way from the left from the top and at a slight angle and cut through all 9 layers being careful not to move the pile around when cutting through the sewn seams. 

10. Take the top THREE pieces of fabric from the top, smaller cut section and move it to the back of that section.  Remember, you're always moving the smaller cut pieces of fabric here. 

 
11. Repeat steps 4 and 5.

12. Make your final cut by positioning your ruler vertically about a third of the way from the right of the pile and make your cut like in step 9. 

13. Take the top SIX pieces of fabric from the top of the smaller piece at the bottom of the section and move it to the bottom of that same pile.

 
14. Repeat steps 4 and 5.

15. Square up your crazy nine patch to 3½” square.  You can square up the nine patch at a slight angle if you want the block to look even more interesting.  


16. Repeat the entire step for each set of nine patches that you plan on making. 

Tips:
·         Mix up your angles so that your blocks look different from each other.  If they all look the same then you loose some of the crazy nine patch effect.
·         Make sure you cuts  at least ½” from the edge of the squares when creating your crazy nine patch blocks to avoid any one piece from being too small.
·         ALWAYS move the SMALLER piece from the cut section from the top to the bottom of the pile.
·         Use a new, sharp blade in your rotary cutter to make cutting through nine layers of fabric much easier.
·         Remember, it doesn’t need to be perfect, these squares are meant to look different!
·         Because you’re going to square off your block, you might want to make the center a bit smaller when cutting and sewing to allow for some extra fabric to be cut off on the outside blocks during the squaring process.
·         Chain piece your pieces together and don’t snip the thread until after you’ve ironed the pieces to ensure that the order never changes. 

Block Sashing
These instructions are for one block.  Repeat for each nine patch grouping.
1. On a design wall or other design surface, lay out your 9 nine patches into a 3x3 layout until you’ve found a layout you like.  Depending on the fabrics you’ve chosen, you might need to do some rotating of the blocks to find an appealing layout. 

2. Arrange and sew block sashing strips in each horizontal row to form three horizontal strips in the following order {sashing, block, sashing, block, sashing, block, sashing}.

3. Take 4 of the 12½” x 1½” strips and place them vertically in between the newly formed strips and on the top and bottom and sew together.  This should give you a 12½” square.

4. Repeat for each block.
Quilt Sashing
1. Using the12 ½” x 2¼” strips, sew the sashing in between three quilt blocks in the following order {block, sashing, block, sashing, block}.  You will not be adding sashing to the outside of the row right now.

2. Sew the five 40” x 2 ¼” strips to the pieces created in the previous step to begin assembling your quilt top. 

3. Sew the 2½” x 58” strips to the last two unsashed sides of the quilt top.     

 Borders
1.Create two strips from your border fabric that measure 6" x 58" and sew them to the sides of the quilt.

2. Create two strips from your border fabric that measure 6" x 55 ½" and sew them to the top and bottom of the quilt.
Finish your quilt!
 

Tuesday, May 1, 2012

Twister Quilt Finished!

This weekend I finished putting the binding on my twister quilt.

I love the way it came out.  I used two It's a Hoot charm packs for the twister portion.  I then used coordinating fabric for the binding and backing.  The white around the outside of the quilt is a Kona white.

I quilted this little quilt on either side of the horizontal and vertical seams.  I was trying to think of some way to play off the twisting pinwheels, and realized that with this type of quilting, the quilting would go through the long point of every pinwheel.

 I love this mini quilt.  I think it would be a perfect baby quilt.  I know so many people having babies this year, so who knows, it could wind up being for one of them.

I can see myself making more of these twister quilts in the future.  They come together so quickly and look great.


Fresh Poppy Design

Wednesday, March 21, 2012

Twister Quilt

Back in January Aimee was supposed to give a demo of the twister ruler but we had one of our few light snowstorms of the season and the meeting was canceled since we have folks traveling from all over the eastern part of Mass.  To make up for it, Aimee gave the demo at retreat.
Rebecca is showing Aimee's sampler quilt that she brought.
Here's the quilt that I made using the ruler.  While Aimee showed us using the ruler for a layer cake, I made this using two charm packs. 

The fabric is Momo's It's a Hoot by Moda with some Kona white added for the border. 

Tuesday, February 28, 2012

More Hand Work

I just got my machine back on Sunday afternoon and spent the rest of the day hiding out with it in my sewing room.  Before I got it back though, I ended up completing a bit of hand work for a wall hanging I've been working on for a while.
I made these hexi's a while ago using a mini charm pack that I had won, unsure of what I was planning on making with them.  While I was machine-less, I finished piecing these together.  I'm going to sew it down onto a cream background, do some echo quilting around the hexi's and bind it in a nice brown kona. 
Here you can see that I have it all pinned down to the middle of the background, ready to be sewn onto the background and then quilted.

Monday, January 11, 2010

Gathering Pics

So right after Christmas, KK, Lynn, and I got together for a quiltathon.  We all used the Thimble Blossom's pattern, Pint Sized to make our quilts.  KK and I made the honeybun version and Lynn made the charm pack version.  Here are some pictures of our fun day...

Here's Lynn working on her teeny tiny pinwheels...

Here are some of those teeny tiny pinwheels made with a Spring Magic Charm Pack.

And one more shot of a lot more (both pics are before they're trimmed)

Here are KK's rectangles using an Aviary Honeybun.  Here's the first two.

And quite a few more...


And I only managed to get one pic of the first two rectangles I made using a Wonderland honeybun.  More pics of mine to follow.

I've been doing a lot of work lately on some machine quilting for a secret quilt that I can't post here.  I'm really enjoying my new machine.  The machine quilting on it is multitudes better than my old one.  It's amazing what kind of difference there is between machines.

Sunday, March 1, 2009

Crazy 9 Patch Charm Pack

I ordered a two charm packs online a little over a week ago and was excited to do a crazy 9 patch with the squares.  I loved the fabric but I didn't want to buy a ton of it.  It's so hard to tell what fabric will look like online.  There have been several times when the fabric I've ordered online hasn't been exactly what I expected.  I figured charm packs were a safe bet to see what the fabric was like.  Plus, I've never worked with them, so I thought it would be a fun way to try both new fabrics and a new type of fabric bundle.  

The charm packs finally came in the mail a few days ago and I could finally give it a try. I'm glad I ordered the charms packs because the fabrics weren't as bright as I expected and I'm not sure I would buy some of the fabrics that I thought I would have.  I do love how all of the fabrics work together.  This might end up being a cute quilt for a baby girl.
 
Onto the actual creation of the crazy 9 patch... I created piles of 9 squares each, trying to mix up the colors in each pile.  I ended up with 8 piles total since there were 40 squares in each of the 2 packs I had.  I finished one pile and am in the middle of working on the other 7.  I might need to order one more so that I can have 12 total.  That way, I can combine the 9 squares from each pile into a block and have a quilt that's 3x4 blocks.  Right now, it's tough to do something with only 8 blocks.  

Here are the finished crazy 9 patches with one pile.  They end up being about 4 inches square once complete.  7 more piles to go!

 
I think I might add some sashing in between each square.  It's still a work in progress.  Maybe I'll turn these 9 into one block using sashing and then combine the others with a different color sashing.  Just a thought.  We'll see how things progress as I finish the other piles.  This is going to be fun.  I'm enjoying making things up as I go along.  This is really the first quilt that I'm doing it with.  I guess it means that I'm getting to be really comfortable after quilting for 6+ years now to be more adventurous.  

I'm curious, have you used charm packs before?  If so, what have you done with them besides just sewing the 5 inch blocks together?